Solar inverters play a crucial role by converting the direct current (DC) generated by your solar panels into alternating current (AC), making it usable for your home or office. However, the installation process involves intricate steps and delicate components that require careful handling.
While installing a solar inverter might seem straightforward, it’s not without its risks. For DIY enthusiasts, the process can be rewarding but requires a pre-existing solar panel setup and a certain level of expertise. On the flip side, professional installation ensures safety and efficiency but comes with its own costs.
Here’s a brief rundown of the installation steps you’ll find detailed in this guide:
- Select the Right Location: Choose a spot that is safe and convenient.
- Mount the Inverter: Use screws to securely mount the inverter vertically.
- Connect to Solar Panels: Turn off the main switch before making connections.
- Connect to the Grid: Ensure proper wiring to integrate with the electrical grid.
- Test the Setup: Turn on the inverter and check for any issues.
Specifically, this guide delves into the installation of grid-tie inverters, which are not only durable but also energy-efficient. These inverters can be installed both indoors and outdoors, thanks to their NEMA ratings that offer protection against various environmental factors.
Choosing the right location for your solar inverter is not just a matter of convenience; it’s a safety imperative. This guide provides actionable tips on selecting the ideal spot for your inverter, ensuring optimal performance and longevity.
Installing a solar inverter yourself can save you a significant amount of money—up to 30% of installation costs. However, the DIY route is not advisable for large infrastructures due to the technical complexities involved.
Can I Install My Own Solar Inverter?
Solar energy systems are not very complicated. They are not very difficult to install. However, doing it yourself can be risky. This is because you may not have the complete know-how. Further, you may not have all the necessary tools and devices. You should only think about installing a solar inverter if you already have a solar panel in place. It is because otherwise, you need to set up panels on your rooftop. This can be dangerous if you are not an expert.
That said, if you already have an inverter, you can easily fix a solar inverter in its place. Also, you will have to connect it to the other parts of your solar energy system. On the other hand, if you do not have an inverter already, you might want to call an expert. This is because you may need to do some wiring or change up the existing wiring. In this situation, it would be better to ask for help.
Advantages Of Installing Solar Inverters By Yourself:
- You can save a lot of money. Also, you would not have to spend time finding an expert and telling them about your needs.
- You can even build your own solar inverter to suit your small needs.
- DIY Solar inverters are also suitable for off-grid buildings. They do not need any advanced knowledge. You can do it even if you are a beginner.
- If you already have some experience, you can save a lot of hassle by fixing the solar inverters yourself.
- You can select your panel designs and tools to attach them. Further, doing it yourself is a great learning process. You would learn many things you need to know about your solar energy system. You would even gain some extra knowledge revolving around solar devices. This would help you in the future with reference to repairs or new products.
Disadvantages Of Installing Solar Inverters By Yourself :
- Fixing solar panels on large infrastructures needs more technical know-how and skills. So if you have a huge house or you are doing it for your office space, you may not want to try to do it yourself.
- You would have to invest a lot of time fixing it properly. You cannot compromise on this because it involves the safety of your devices.
- Fixing solar panels one after the other is not very efficient. This is because it needs teamwork to raise panels to the top and assemble them into your home’s electricity system.
- Apart from this, you need some particular tools to fix them correctly to prevent danger. While you can buy these tools, you also need to learn how to use them correctly. Each of these tools would come with a set of safety rules.
- Further, you have to follow some safety precautions before fixing solar inverters. If you do not have prior experience, you cannot skip reading the manual through and through.
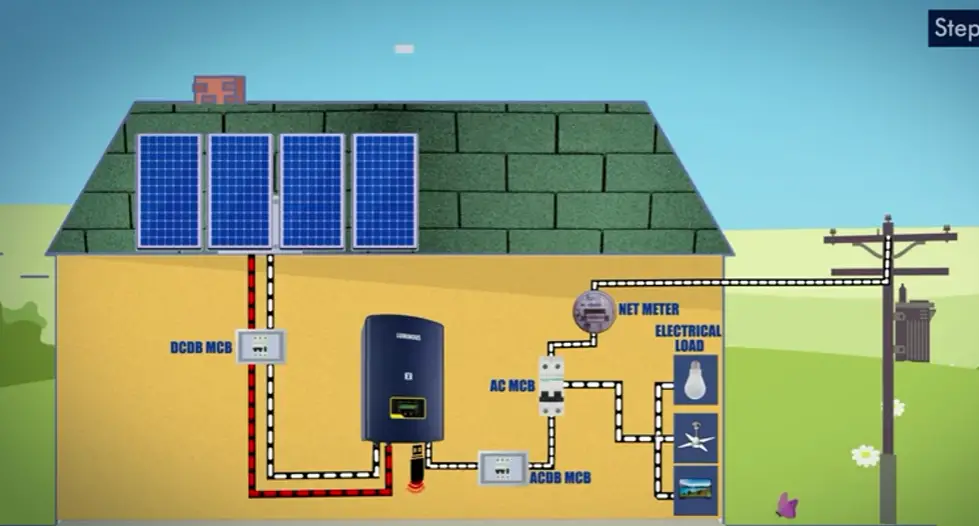
Solar Inverter Installation Diagram
The following diagram shows the installation of a grid-tie inverter. The inverter is mounted vertically in the middle. It is connected to the solar panels and the grid. Further, it has an additional dongle for remote monitoring.
How To Install Grid-Tie Inverter?
Grid-tie systems generate power from sunlight by utilizing solar panels. These systems store the remaining power and give it back for future usage. These systems are well connected to the electrical power grid permanently. Grid-tie inverters are suitable to keep in the areas outside your home and you also can fix them in interior areas.
Moreover, most of the grid-tie inverters are made for outdoor usage. Also, it is embedded with NEMA 3 RX or NEMA 4 X that protects them from dusty weather, rainy season, and corrosion. So before buying your solar device, check whether it has a NEMA rating. That said, some grid-tie inverters are not made with water-resistant materials. So they can be fixed only in the interior locations.
Grid-tie systems are one of the easiest to fix that need fewer tools to work with them. Some steps you can follow if you want to install them is :
- Pick a good location for installing your inverter.
- Mount the inverter vertically. If you are installing two inverters, you should have enough space between them. Use four screws to do the job.
- Connect your inverter to your solar panels. However, you should ensure that you have turned off the main switch before connecting your inverter.
- Connect your inverter to the grid.
Benefits Of Using Grid-Tie Inverters
- Grid-tie solar inverters are very durable.
- They consume less energy compared to other systems.
- It is comparatively very easy to install them.
- They do not give you a high electricity bill.
- They do not demand any batteries.
Where Should A Solar Inverter Be Installed?
Before fixing your solar inverter you have to choose the right place to install them. The place where you are going to fix your inverter should not be in the vicinity of direct sunlight. Direct sunlight not only causes overheating but also reduces the life of your solar inverter.
Further, you should choose a location which has ample space for air. For long-lasting inverters, you should maintain them with enough air ventilation on both sides of the panel. Enough air circulation around your inverter is essential. While working, your inverter may get overheated. Some inverters do not have a fluid coolant. And, such inverters have ventilation ducts to remove excess heat. Thus they must be placed in areas where they receive air.
That said, even if your inverter is fluid-cooled, you should still pick a place that has air passage. This would ensure that no dust settles on the vital parts of your inverter. Also, make sure the place where you are going to fix the solar is low in moisture. Moreover, choose a well-shaded place to install your inverter to extend its lifespan. In addition to this, place your solar inverter away from humidity, moisture, high temperature, and rainfall.
Your inverter requires maintenance and timely inspection. Thus, you should install it in an accessible place. Also, ensure keeping it in a safe location to avoid any electrical shock. Apart from this, make sure that your wall is firm enough to carry the weight of your inverter.
Moreover, you should ensure that there is ample space between your inverter and the ground. There should be at least 500mm between your inverter and the ground. You must maintain the same distance between your inverter and the ceiling.
You can also put your inverter indoors, depending on its NEMA rating. However, you should confirm that it does not come in contact with too much moisture or high temperature.
How Much Does It Cost To Install A Solar Inverter?
The solar device’s price would change based on their ability and efficiency. It depends on the various features it can provide. If you buy something that is outdated, it would cost considerably less. You may also have to pay more depending on the brand and the reliability they give you. Moreover, it depends on your home’s on-grid and off-grid structures.
Nonetheless, the average money it would cost to install your solar inverter is around $18,000. Here are a few factors which influence how much you would have to spend to install a solar inverter in your home or office:
- The size of the inverter you need to fix
- To inspect your building whether it suits to keep them.
- Also the types of materials you select.
- The pay you have given for your installer.
- Hence, the investment tax credit for your solar inverter.
- It is also based on the usage of electricity and innovation.
The installation cost for a medium-sized building is from $ 1000 to $ 1500.Also, the cost will increase according to the size of your building structure. The average cost of a grid-tie system is from $11,389 to $13919. Almost all of these systems’ price ranges from $2.57 to $ 3.14 per watt.
For an entire house, the minimum cost to install the solar inverters is from $10,626 to $26,460 for a 6KW to 12 KW system. Also, the average lifespan for this solar is about 15 years.
Note: The above prices can be changed without notice.

Eng. Matthew Joseph Nandirio is the Founder of walkingsolar.
After graduating from the University of Houston in 2002, matt started working as a Solar Electrical Engineer for several multi-national solar energy companies.
He has a wide range of experiences including solar system requirement analysis, planning, maintaining, debugging and even solar device development through research.
He now shares his 20 years of expertise through his articles on the walkingsolar website.
Further, he is also the author of two books on Solar Technology, “Solar Power for Villages” and “DIY Solar System for Dummies”.